Tuesday 7 July 2020

Heads and tails - manipulating images as text using the command-line and sed

I discovered that working on a batch of files in a fashion akin to the word pad effect it was possible to use basic text manipulation on the command line thus opening up a wider range of sorting and manipulation and possibilities for glitching

The most complicated method is to treat the files as text but to protect the header and footer (which tells whatever program is accessing it what kind of a file it is and how to read) it by stripping those away and  re-adding at the end of the process . To do that I take a sample header and footer from a single file in the batch ( given that the batch are all of the same size and type and as near to raw as possible ) . Its probably good practice to have your source, intermediate and destination folders setup ( you need 3 folders to avoid overwriting existing files and thus rendering them useless) – so redirect or copy paste the header and footer into the destination folder to avoid overwriting or accident ) .

To get the header – do ‘head -n 5 somefile.extension > head.extension’

To get the footer – do ‘tail -n 5 somefile.extension > tail.extension’

Delete the first and last line of each file in the folder ( excluding header and footer) with ‘sed '1d;$d'’

After whatever operations I’ve carried out on the files I’ll rewrite the header and the footer to the files in the destination folder .

How does that work in practice

The above is just an outline of the process, below is an attempt to put that into scripts for use on the command line. *Note – if you cut and paste from here remember to miss out the ‘’ at beginning and end .

So we get our header and footer with;

‘head -n 5 somefile.ppm > head.ppm’

‘tail -n 5 somefile.ppm > tail.ppm’

Notice that I use the file extension of the format I’m working with ( in this case ppm) – this is important as the head and tail describe what the file is.

Then we need to strip the first and last lines from each file and redirect the output into our intermediate directory with this;

‘for file in *; do sed '1d;$d' "$file" > /home/ian/test/intermediate/"$file" ; done’

(We need to strip the first and last lines so that the file stays the same size and thus readable when we have worked on it and re-added the head an tail at the end )

now we exit from the source folder and go into the intermediate folder and open a terminal and think about what to do with each file . As this is a batch process and we are treating the images as text lets swap every other line with this command;

‘sed -n '{h;${p;q;};n;G;p;}'’

or we could choose to reverse each character on each line with this ‘sed '/\n/!G;s/\(.\)\(.*\n\)/&\2\1/;//D;s/.//'’ - but we will stick to the first example here.

As a script it will look like this

‘for file in *; do sed -n '{h;${p;q;};n;G;p;}' "$file" > /home/ian/test/destination/"$file" ; done’

so now I change into the destination folder and I want to make the files readable again by adding the header and footer back onto the files.

‘for file in *; do cat head.ppm 1<> "$file" ; done’

*Note that the terminal complains at the end of that ‘cat: head.ppm: input file is output file’ - ignore that its just telling you it doesn’t want to overwrite the head.ppm file.

And remember we also have to add a tail to the file so with tail.ppm lets do that.

‘for file in *; do cat tail.ppm >> "$file" ; done’ ( notice arrow redirection is different to first one for a fuller explanation of redirection look here https://www.guru99.com/linux-redirection.html )

*And once again the terminal complains ‘cat: tail.ppm: input file is output file’ - ignore that.

All being well we should now have a folder full of readable but glitched files . What you do with them after that is up to you – you can either turn them back into video with ‘ffmpeg -i image-%03d.ppm video.mp4’ or a gif ( find information on methods here - https://stackoverflow.com/questions/3688870/create-animated-gif-from-a-set-of-jpeg-images#29542944) or you could just pick the ones you like the most and upload to your forum of choice.

( As a side note I have found that this can be done with mpeg video by getting and saving the head and tail then stripping the head and tail then using the above process to swap every other line, without cutting it into single images – its quite flexible, try it on different formats) .

This is a video of the above in practice.


Or we could just run a simple bash script like this, remember to make it executable before running (Warning, this operates within the working directory and directly alters the files within that directory there is no redirection , always always make back ups). 

#!/bin/bash

  find . -type f -name '*.bmp'|while read filename; do echo ${filename};

#get header
  head -n 3 ${filename} > head.bmp;

#strip header and footer ( though you might get away with just the head)
  sed '1d;$d'  ${filename} > swap.bmp
 
#swap every other line
  #sed -n '{h;${p;q;};n;G;p;}' swap.bmp > swap2.bmp;
 
 #delete empty lines ( like standard wordpad)
 #sed '/^$/d' swap.bmp > swap2.bmp;
 
 #the original blocky hex !!
 sed 's/[a-z]*/(&)/' swap.bmp > swap2.bmp;

  cat head.bmp swap2.bmp > ${filename};
 
   rm head.bmp;
   rm swap.bmp;
   rm swap2.bmp  
   
   done


Sunday 5 July 2020

The Ethics of sources Day 6 - Sound

Welcome back to part 6 of The Ethics of sources, the original talk can be found here -Ethics of Sources Day 6


Today I’m going to be talking about sound , and when I say sound , I mean sound , I’m not a musician, and the sound that I use in my work I don't consider to be music as such , more as a product of the processes and manipulations that I put files and codecs through – I make broken sounds to reflect a broken file and a broken narrative .
Before I made glitch art but made video I worked for a long time on an animated film based on my sister Rowena's paintings called colour keeper , that was back in 2006 / 2007 Back then I took a bunch of songs I liked and chopped them into the video in a way which suited the emotional narrative of the film I was making . Rowena's paintings reflected the childhood we had and so did the songs , unfortunately at the time Myspace didn’t take to kindly to this use without permission and decided to pull my video and put me in what they called copyright jail so I had to prove I was a good person and wouldn’t do it again.


I could see their point and pulled the video and it only exists now as a ghost file sitting on a back up dvd somewhere . Lesson learned, so for the next version of that animation I used the sound of an old musical box that I recorded with a microphone and re-edited with Audacity and stretched and redited and did some strange things with mad with the power of an opensource sound editor .And uploaded that to YouTube – thinking that the wild west that it was then (2010) It surely would be fine 


Aaah no , a few hours later the video had a copyright claim against it for the soundtrack which bizarre as that was I did think well shall I contest this and in the end I just couldn’t be bothered so I took that down and between those two takedowns lesson no.2 learned
The third version was right at the beginning of me making glitch art and was the first time that I'd really thought about what the sound could be like, ( its also one of the few pieces I’ve made that has been exhibited irl) id begun experimenting with listening to the sound that video made when put into audacity – much to the disgust of our dogs who howled or barked if I played anything out loud and came up with a soundtrack which sounded a bit like a monster lurking in a basement chewing on bones and it sounded a little like this:


Glitchkeeper


Strike three happened with this video I’d made just before this which had been subject to another take down because I’d used Iggy pops nightclubbing as a backdrop , basically a small sample of the strange and boozy reverby drums looped , so I thought I’d make the sounds as obnoxious and unmusical as possible . Again I think this is the sound of a video file run through Audacity .
 
Tunnel ( 2010)


And I suppose the copyright take-downs kind of coloured my approach to sound as well , let the bots chew on this !


One of the things I find fascinating about glitch art is that some techniques can have unintended consequences – this file when I made it originally before hex editing had no sound – and somehow in the process of hex-editing it ( a process using some kind of sort on the commandline but I can't remember which ) generated the sound that you hear in the background. The sound does seem to reflect what the video is doing.
 
BDN2


The sound on the next video ( based on TV news bulletins from the day of 911) is a combination of taking the sound from the original video sources and reworking them with audacity plus feeding the transcript from that day of data transmissions and pager messages ( dumped via Wikileaks) through a command line text to speech software called festival then reversing some of the audio on top of that . Speech synthesis fascinates me in that you can take anything that is text and turn it into sound . Festival speech synthesis website here - http://www.cstr.ed.ac.uk/projects/festival/


The video is 2 DVD plyers mixed through a dirty video mixer based on karl klomps design find that here - Karl Klomp dirty video mixer


The end result looks like this, and apologies for the poor quality of the render , was back when I was still learning about these things ( the speech synthesis sections are around mid-way) 

The Imaginary Tower


Getting back to speech synthesis we could use this, another open source speech synthesizer get gespeaker through your package manager on linux , or compile it from source more on that here gespeaker


And with this we could also turn video into text using xxd as in the slide below.


Taking speech synthesis a bit further we could use a gui application like gespeaker ( gespeaker is a gui frontend for espeak so its also command line as well) so here I’m streaming the contents of the file 'hitcher16bit.mp4' using xxd to a text file containing hexadecimal values then opening that txt file in gespeaker and looking at various ways of playing it back in either male or female or different speeds and pitchs.

Gspeaker in action 


which is what I used in the next video ( genhex265.mp4) . Here I use a text about Derrida and then play with that in audacity at different speeds . So in some sense it misinterprets text as sound, at different pitches the highpitched squealing is the same text speeded up greatly with a number of effects on top of that .

Genhex265


To take the speech synthesis a bit further I could turn a html text into a speech and play around with that further

 Percent percent 3


More important for me sound wise was the discovery of an application called the vOICe , which in essence is a system designed to teach the blind to see by using a from of audio radar that changes what a webcam sees into sound, the application which created the video element base of the previous video . As well as being able to use a webcam as input it can also use the desktop itself and sound out and view what you point the mouse at – so in this case I'm using the desktop as a feedback loop to create sound .


vOICe in action (FIC1)


And sometimes if you get the sound just right you can achieve some beautiful organ-like bell tones
 
Maze 4


So as well a sonifying our desktop we could also turn sound into video.


 We will take the sound file created by gespeaker earlier and turn that into video using this method .

Take any wav file , change the file extension .wav to .yuv . In the same folder open a terminal and enter this command ( using ffmpeg ) 'ffmpeg -f rawvideo -s 640x480 -r 25 -pix_fmt yuv420p -i yourfile.yuv -c:v libx264 -preset ultrafast -qp 0 output.mp4'

Which gives us this


Obviously this is a very basic example but it does hold possibilities, for example turning a video into sound as wav then maybe adding effect like reverb etc then turning that sound back into video , a kind of sonification which is a common technique in glitch art but not one that I use much myself .

As I showed before  when I talked about datamoshing there is sound that happens in the process of datamoshing or even hexediting when the sound within a file becomes damaged by the process , my favorite format for that is magicyuv as in this video:


Eat yer greens


The use of glitch in music probably predates visual glitch art , and our very first experiences of glitch may be the sound of a skipping cd – in fact whole albums have been made using this method , especially by the group oval and this seminal work from 1994 - Diskont , and they have influenced my approach to sound in my own work using their methodolgy ie take a cd , mark on it with felt tip pens then record the stuttering sounds the cd creates.


Extract the sound from a video file using this command 'ffmpeg -i your.mp4 -vn rippedsound.wav' ( I use wav as I want to retain the highest quality file I can for burning to cd ).Burn that file to cd, mark the cd with felt-tip pen. Record that playback in the software of your choice ( for me audacity )
Adjust the sound and edit, add to your newly glitched film.

I use this technique on a lot of the black and white film noir that I sourced from archive.org . This was originally black and white but I ran it through on of my computers running linux mint bea 2.1 which colourised it 


Confessions.


I also use this slinky device , mine is actually the only one I have ever seen in real life as basically it came around at the wrong time . Essentially what it does is you tell it a genre and organize beats , bass lines and drums etc from its sound-banks and it composes on the fly a new and unique track , every time you run it. It also has the abilty to save what you make and also has a handy line out and mic in , and it is quite the strangest device I have ever used , but as it creates generative music , each track is unique , royalty free and copyright stays with you the creator – cos like you just created it , that's the nature of generative music , given a few algorithms anything is possible , and it does all of this in real time . I have used this in some of my work as sound accompaniment for instance on this video , though I've messed around with it after in audacity , I tend to leave the device running, record the output and then pick out bits I like . More information on this unique device here - Dr Mad

Blood Moon


So to conclude, there is no one approach I have to sound in my work , I tend to like broken sound or sound that fits the motion of the video . 

The final day of the residency ( Day 7) was a live performance/ demonstration with live skipping cds , find that here -  The Ethics of Sources Day 7


Saturday 4 July 2020

The Ethics of sources Day 5 - Finding and exploiting hardware and operating system flaws and circuitbent webcams

Welcome back to part 5 of The Ethics of sources, the original talk can be found here - Ethics of Sources Day 5

The reason I first got into making glitch art was whilst experimenting with converting cheap digital cameras to near infra red ( I was still painting then and trying to find new ways of looking at the world) I h found a really really cheap camera given away in a company promotion and having taken a few photographs with it I downloaded the images onto my laptop and noticed that they were in a strange image format called ppm and when I opened them up some of them were really mangled .  ( below is what I consider to be the very first glitch ever made by me )

And from there I started to discover circuit-bending ( the art of making devices malfunction in creative ways ) and through a designer friend ( Thanks Claire Penny) the work of Philip Stearns and specifically his 2012 ' Year of the Glitch' where he takes early Kodak digital cameras and rewires them creatively and records what he does. You can find more about this here  - https://phillipstearns.wordpress.com/tag/year-of-the-glitch/page/2/
And also The work of Rheed Ghazala , considered to be the father of circuitbending. Read more about his work and ideas  and safe ways and methods of circuit-bending which I should state for safety reasons NEVER CIRCUIT BEND A DEVICE DIRECTLY CONNECTED TO MAINS ELECTRICITY  - here Anti-Theory

From there I started to Modify my own cameras based on researching Philip Stearns and Rheed Ghazala and a few other online resources.
And started to film with the results of my experiments for instance this :


The theory and practice of what I'm doing is deceptively simple and largely a process of trial and error and parallels what I'm doing with files through hex editing and data-moshing and one other method I'll discuss further on, but in some ways is more satisfying as I can achieve effects and textures which are uniquely mine .

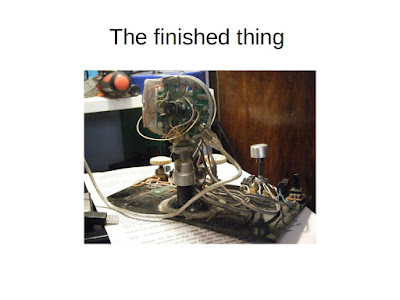
How do we do this? First find a camera , preferably a cheap old webcam, newer webcams are a lot harder to bend due to the change from large discrete ccds to system on chips which roll the ccd and a few other components into a whole package, though there are ways around it which involve soldering onto or bending pins on the image processing chip. Open the camera up, remove the lense to expose the image sensor, attach webcam to pc and open up whatever webcam viewing software you are using ( so that you see the bends as they happen) , then take short lengths of wire and short circuit between points on the ccd. Note or mark where the best bends are and which ones to avoid , as some bends will either freeze the camera meaning you will have to disconnect and reconnet the usb connector and restart the webcam software , other times you might get a blue screen and restart on windows or crash and restart on Linux . As you can see from the previous picture of the camera I'll then solder onto these points and then attach potentiometers so i can control how much of a bend I want . Eventually I'll mount them so they are more usable and less fragile - like this.


Then I Point them at a source and adjust the pots until I get what I like - a lot of the time this means pointing at a crt monitor ( crt works better than lcd/led , crisper colours and no backlight glare) which is playing back video or TV or using an operating system which has flaws in the way it plays back video ( I never really just use one process)

Go go preaching - (worlds end)


This is made with a different camera to the previous video, one of the things about circuit bending is that you get a different look and feel depending on the camera and lens which leads to some unique images which you just can't get with say hex editing or data-moshing alone, regardless of which codec you use so its a good way of getting something that looks different. When everyone uses the same techniques and codecs and methods things can begin to look a little samey, though I could equally say that about painting or other old media , it's how you use it that matters, but circuit bent cameras become uniquely yours .

The sound on this is also by me, made with a circuit bent casio tone pt1 and a diy ring modulator all put together in Audacity I'm always playing around with ideas and I was just interested to see if that would work.I have an uneasy relationship with sound preferring usually to salvage sound from the brokenness of the file, the artifacts that hex editing can create from a file ( but I'll talk about that more in the next post ) .

We could also run the circuit bent camera through processing , but Ill leave that for another day as I've covered some of those techniques elsewhere. 

Circuitbending graphics cards.

I've also been experimenting with bending older graphics cards with mixed results. So far I've been using older pci and agp graphics cards such as an old pci avance logic ( actually one of the best so far) and early ati agp cards - though this method is riskier and can lead to the computer shutting down and causing damage to the card or the computer - I avoid the actual graphics chip and concentrate on the ram chips and short-circuit those and try to capture the output with my vga to composite adaptor and trusty pci pinnacle pc tv rave .

Circuitbending a graphics card 


Or this in black and white 


I also look for damaged cards ( Avance logic)


Some damaged cards can also have some interesting effects, though they can be tricky to work with as its often hard to get an operating system up and running when you cant see the prompts or instructions onscreen due to artifacting . This is my favourite damaged card so far though ( the only info on the card is the main graphics chip which reads as an Avance logic inc ALG2302.A) 

Don't just use one technique

As I say, I don't just use one technique or method, I will often use a combination of circuitbending, hex-editing, datamoshing, and a newer ( and at the moment primary ) area of research for me misinterpretation through operating system flaws in video playback. This started when I was trying out an operating system called Legacy OS 2017 .

Using old computers and Legacy OS 2017

I have a thing about using old computers in my work, mainly through necessity, I'm sure that's true for most of us, I would love the latest 64 core 128 thread Ryzen , but I just can't afford it so most of my work is made on low end machines. Too see how low end I could go and still make glitch art I happened upon a version of puppy linux called legacy os which was optimised to run on pre pentium 4 machines , it worked reasonably well on a pentium 3 with a small ( when I say small I'm talking about 128mb to 256mb ) amount of ram and a modest graphics card. I also use legacy os to test out machines or check the contents of hard drives, like a lot of Linux distros it will boot from cdrom without the need to install it . 

So one day I was testing out a computer and it had this agp graphics card in it, a radeon hd 3650, and one of my tests when I'm checking out a machine is to look at what video playback is like ( is it fluid , choppy etc) and i was playing back a video in a video player that I spotted called quickplay ( which I have never found in any other distro but this ) when something like this happened( I can't remember what the original footage was , I think me wondering around the farmyard where i used to live I think )

The beast in action 


And it kept on happening, it was reproducible, if I played back video on this machine with this graphics card 

Skullduggery


I tried different graphics cards with the same operating system and the same video and the same video player but no, it had to be this one graphics card and then only some files would actually play mainly mpeg 4, h261, mpeg1/2 and libxvid and other stranger file formats like magicyuv.

Key points 
1) Run legacy os in live mode from an ide cdrom ( it doesn't like sata)
2) Graphics card must be either an agp Radeon Hd3650 , or as I later found a pci-e radeon x300se ( found in a lot of pentium d era dell dimensions ) or a HD 5000 series or HD 7750 ( though I also later discovered if at start up when choosing the display manager you choose xvesa instead of xorg you can replicate some of the effects seen with a radeon card ) 

Choose your display manager 

As I later found it when setting up legacy os at startup you get to choose the display manager , in both xorg and xvesa there is an option to choose either 16 bit or 24 bit colour and that can also give interesting results when using quickplay :

Video playback in quickplay running in 16bit colour


Output is obviously dependent on input - so choice of codec and container matter, for instance this is the same setup as before running xorg in 24bit colour but trying and failing to play a file encoded to h264 in an m4v wrapper encoded by handbrake.


Interestingly many of these faults do not work if you install the operating system to a physical hard drive , especially those found in linux mint bea 2.1 and legacy os 4 mini ( the newer version of legacy os 2017 ) .

Older operating systems can be exploited for glitch art


Older operating systems can be exploited - especially those based on older linux kernels ( 2.6.32 and lower) that have incomplete or incorrect support for certain video cards and / or incomplete support for newer codecs such as H264 and cavs. This can be exploited if we have a supply of older motherboards and a basic knowledge of how to put together a desktop computer plus a supply of older video cards to test , often giving us surprising and unique faults , allied with older versions of vlc and other mediaplayers such as gnome-mplayer. A source for old versions of linux can be found here old versions of linux 

The Video below shows how by feeding a tailored mp4 file to kmplayer in legacy os 4 mini the display can be corrupted and subsequent files played back will retain that corruption - I've recently found a more elegant version of this in Linuxmint bea 2.1 from 2006 which does not rely on this method.

Xorg corruption in legacy os 4 mini


This fault also relies on having any of the Radeon cards already outlined and it looks a little like this ( the display is corrupted right from start up and remains like this throughout playback even if we exit and re-enter the display by restarting it with ctrl alt backspace , unlike legacy os 4 mini which requires that you play the tailored file again ) .


Video playback in linuxmint bea 2.1


The computer this is being played on is also very modest - and old socket 754 winfast from 2005 running an AMD 64 sempron 3000 and 1gb of ram with an Ati radeon hd3650.  And to me this is a much more elegant and useful corruption , though the corruption does vary depending on which ati card you use - contrast the above with the video below which was on a different motherboard but with the same card the motherboard was an msi socket 775 rocking an old Pentium 4 with hyper-threading


Error must be repeatable to be useful

A lot of these findings come from my research over the last year into installing and using different Linux distributions, having had a hint of what might be possible through finding the first errors in Legacy OS 2017, these distributions have so far been the most fertile ground for finding errors in video playback due to a combination of buggy hardware support for newer Ati cards and buggy support for codecs in media players. I've documented this research elsewhere ( in the talk given at last years Fubar and in earlier blog posts) and I don't want to repeat that too much as I'm just trying to give and overview rather than a detailed walk through but below are two of my favourite errors, both repeatable and neither relying on specific hardware or cards , that is also something I feel is important, if I find and error I feel that it must be repeatable to be useful .

H264 playback in VLC on Ubuntu 6.06 


This one came as a surprise. I have a series of videos in different formats ready to play on an external hard drive just for this purpose and I loaded up a H264 file into VLC and this happened , the beautiful sliding from right to left which is similar to pixel sorting but more fluid.

The next error was completely unexpected. Before I discovered using cheese webcam booth and later obs-studio as my main capture software I would often use gtk-recordmydesktop to record the output of the malfunctions of whatever OS I was testing at the time running through tvtime viewer which showed the output of the vga to composite adaptor I was using. Now, gtk-recordmydesktop records in ogv format, which has been a common standard for video on the Linux desktop since 2005/6 ? I'm not sure of the exact date but you would think there would be some element of backward compatability but as I discovered newer recordings of ogv in modern versions of Linux played back on older distributions turn into this beautiful Hot mess 

Ogv playback in Gnome-mplayer on Ubuntu 10.04


The next blog post in this series will cover sound.


Thursday 2 July 2020

Ethics of Sources Day 4 - Divide by stills

Welcome back to part 4 of The Ethics of sources, the original talk can be found here - Ethics of Sources Day 4


I’m calling this blog Divide by stills as we will be Taking a video and dividing it into stills and showing how you can work on the stills through hex editing, convolution and glic – and how different formats break ( cover dds png /ppm )

Now why on earth would we want to take a video and divide it into stills when all we are trying to do is glitch the video ? Primarily control over the process, plus access to different image formats that aren't availablewhen working with video ( though it is possible to encode something like xwd or png or jpeg2000 into video).  The other reason is to achieve readable video at the end which doesn’t require baking, and we can tailor the process at the beginning by only running commands on one or a small number of images before committing to a batch process and for some techniques and formats this actually works better, say if we want to use a format like dds or ppm or even something obscure like sgi – all of these formats have unique qualities when hex edited which you cant get with a video codec.

As an example this is a film I made sometime back in 2017 – this was an original film from 1968 sourced on archive.org, chopped into 34000 individual stills ( xwd format) hexedited then reassembled using ffmpeg. Audio is taken from original converted to cavs, hex edited then captured using audacity on a seperate computer . final video and audio put together with flowblade . Clip below and full video on my peertube channel here

Pretty Broken Things-2017


How do we go about this then lets choose a video ( this is a section of a video of a Ballet by Oskar Schlemmer and elsa Hotzel called ‘the triadic ballet’ ) and then put that in its own folder, this is important as this process generates a lot of stills ( ill often use a scratch disc for larger works)so we will just work on a small 30 sec film through this session .


so lets go ahead and divide this up with this command 'ffmpeg -i ballet.mp4 -vf fps=16 image-%04d.ppm'


So Just to explain that command . ffmpeg -i take ballet.mp4 or whatever video you are using as input , -vf = Create the filtergraph specified by filtergraph and use it to filter the stream , -fps=16 ( we will change that to match the framerate of the video ) as frames per second – output those frames as this string starting from 0001 - = image-%04d.ppm . In simple terms – take this video, divide it into this many stills per second,  as a series of images in ppm format and name them image-xxxx.ppm as you create them starting from 0001. ( ppm is an image format akin to bmp. I find the closer to raw you get the better the results). 


Now we are going to hex edit these stills first with this command which basically searchs for all file types specified in this folder , hex edits them ( as in the previous days talk ) and then redirects the output to a new folder – remember never copy a file onto itself as then all you have is blank files – I also want to keep the file numbering intact for the next step which is important when we put the stills back together (ffmpeg likes a nice orderly sequence of stills).
 
As I said previously, never copy a file onto itself , but what if I have a dozen or say 3000 files to work with ? Well this is what this script achieves – although in this version its set up for hex-editing it can be modified to do something like pixel sorting or pretty any much any command line script you can pipe to.

This is what this script ‘ find . -type f -name '*.ppm'|while read filename; do echo ${filename};xxd -p ${filename} | sed 's/cade/18/g;s/0a/0b/g;s/00/00/g;s/0/0/g' | xxd -r -p >/home/ian/Desktop/ballet/modified/${filename}; done’ does
find . -type f -name '*.ppm' = look in this folder find files with .ppm extension
|while read filename; do echo ${filename};xxd -p ${filename} | sed 's/cade/18/g;s/0a/0b/g;s/00/00/g;s/0/0/g' | = read the filename feed it into xxd which turns it into a hexadecimal stream which is then read by sed which changes the values you specify between the //
xxd -r -p >/home/ian/Desktop/ballet/modified/${filename} = use xxd to turn that stream back into an ordinary file then write that file to the folder specified after the >
; done - = this script is a loop so it checks if there are more files to do if not it exits if there are it returns and finds a new file to work on .
Ouch !
So simply put it looks for files with the extension you choose , hex-edits them then outputs the new file to a separate folder. This what it looks like in action.


Once that script has run we can look into the output folder and look at at the files in an image viewer – now I have imagemagick installed and we could open them up with imagemagick’s image viewer ( if the file is very damaged often imagemagick will be the only viewer that works). Get Imagemagick through your package manager on Linux or here - Get Imagemagick here


Imagemagick really is one of the best command line based image manipulation programs you will find . Often hex edited files are damaged and it's a good idea to bake the files in a similar way to how we would bake video and to do that we will use this command ( mogrify is part of imagemagick )


Bake files with mogrify


Lets put all of that back together with ffmpeg -i image-%04d.png -c:v libxvid -q 9 ballethex.avi this basically reverses the process we did earlier turning the stills back into video sequentially starting at the lowest file number to the highest.

So the first time I ran this with the png's I created using mogrify  it didn't work, for some reason ffmpeg didn't like the format of the png files so it just halted so then I ran the same command but specified the ppm originals and it worked .

Some re-assembly required 


But what does it look like ?


I could go back and change some of those values in the original bash script if I don't like the initial results or the files are just unreadable – I'd tend to run this a couple of times before I get something I really like but I’m happy with this as an example .Trying different image formats will yield different results and that's what its all about, experimentation. Just be aware that if you use longer files you will generate more images and the script will take longer and fill more hard-drive space. For larger projects I have often generated upwards of 70000 images and had to divide the video into groups of 10000 stills just to be able to manage the process without the disc succumbing to a large amount of churn ( the disc struggling to read and display the output ) , A scratch disc is a good idea . 

Convolution
Having looked a little at that lets look at something slightly  different - convolution, I'm not going to cover it too deeply as its quite a complex concept and I don't want to muddy the waters of understanding a good place to start is here though https://en.wikipedia.org/wiki/Kernel_(image_processing) )

Essentially its  moving across an image with a grid comparing and changing values – the true master of this technique is Kunal Agnohotri – this next section is an abbreviated form of what he does but on the command line using imagemagick and mogrify. 
There are a couple of different matrices I’ve used in my work for example this video where I've used some of the technique I just outlined and a fair few others – nothing I make is just one technique its a combination.


But for our purposes today we will just run this ( you can cut and paste and run this in a terminal in the folder where your images are )

'for i in {1..2}; do mogrify -morphology Convolve '3x3:

-100, 5, 100,
100, 5, -100,
-100, 5, 100 ' *.ppm;echo $i; done'

what does this do well its a little complicated and I don’t want to muddy understanding so simply put imagine that your image is a grid of squares say 640x480 , this script starts at the top of the file in a 3x3 grid sliding along and comparing values that it sees multiplying locally similar entries and summing putting the new value back down into the file as it passes . Lets look at it at work on the folder of images we created earlier before we hex edited them . ( notice that this changes the actual files with no backsies – you could redirect them into a new folder but this is just a quick example ) 


 We could run this on a batch of already glitched files and get this:


Now this isn’t the greatest of results but tweaking the values in the convolution matrix can result in some pretty startling results though I would suggest looking up Kunals' work if you want to get down and dirty with a nice gui ( I just like doing things basically and command-line)

Glic ( Glitch image codec)

what can I say about glic ? It is beautiful to work with allows you to save presets and just works – at this point ill just run on the stills we created earlier it and talk about the interface and what it does and how to use it where to get it ? First you will need the processing environment which is available for Linux, Mac and Windows Get processing here

And you will need the Glic image processing script Get glic here

 Using Glic 


Now we've made a whole bunch of glitched stills we need to turn them back into video ( well I do you could just work with stills and sort through for the best ones) and Processing has a handy script which will allow you to turn the stills back into video and it works like this 


The end result 


In the next post I will be talking about Finding and exploiting hardware and operating system flaws to make glitched video , and a short introduction to circuit bent webcams and how I use them in my work.


ikillerpulse ( requires tomato.py in working directory)

I've been working on this script for the last week or so. What does it do? It takes an input video/s,  converts to a format we can use f...